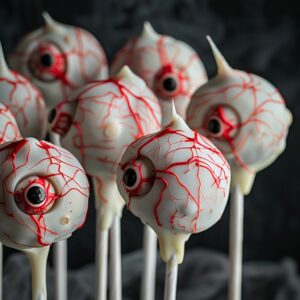
Thank you so much for stopping by today! Whether you’re here for Halloween inspo, a quirky birthday party idea, or just want to surprise your favorite horror movie fan with a treat that stares back, I’m so excited to share this one with you. These Eyeball Cake Pops are creepy, cute, and completely delicious—and if you’re new to cake pops, I promise you, it’s easier than it looks!
Eyeball Cake Pops are the perfect balance between fun and flavor, and in today’s post, I’ll walk you through exactly how to make them step-by-step. Don’t forget to subscribe so I can send this recipe right to your inbox for easy saving!
What Are Eyeball Cake Pops?
Eyeball Cake Pops are essentially classic cake pops that are shaped and decorated to look like realistic (or cartoonishly goofy!) eyeballs. Moist cake is crumbled and mixed with frosting, rolled into balls, and dipped in white chocolate or candy melts before being decorated with colorful irises, dark pupils, and eerie red veins.
They’re perfect for Halloween parties, zombie-themed bashes, or even a gross-out dessert table for little pranksters. I mean, a platter full of edible eyeballs?! Anything but boring!!
Why You’ll Love This Eyeball Cake Pops Recipe
Spooky & adorable – Just the right balance of creepy and cute
Make-ahead friendly – Great for party prep
Endlessly customizable – Change the cake flavor, the color of the iris, or even make bloodshot effects!
Fun to decorate – A great project for kids and adults alike
What Do Eyeball Cake Pops Taste Like?
Despite their eerie look, these little guys are absolutely scrumptious. Inside that candy coating is soft, rich cake (I used red velvet for extra drama!) blended with just enough frosting to create a fudgy, truffle-like bite. The white coating gives a lovely snap, while the edible decorations bring a bit of sweetness and crunch.
You’ll forget you’re biting into an eyeball… until you look down and see a tray of them staring at you!

Benefits of Making These Cake Pops
Great hands-on activity with kids
Impressively themed but surprisingly simple
Can be made in advance and frozen
Travel well for party potlucks or school events
Use up leftover cake or cake scraps
Ingredients You’ll Need
1 box red velvet cake mix (or any flavor you like!)
Ingredients to bake the cake (usually eggs, oil, water)
1/2 cup cream cheese frosting (store-bought or homemade)
12–15 oz white candy melts or white chocolate
Candy eyes or colored candies (like M&Ms or Life Savers)
Black decorating gel or black edible marker
Red food coloring or red decorating gel
Lollipop sticks
Tools You’ll Need
Mixing bowls
Hand mixer or stand mixer (optional)
Baking sheet
Parchment paper
Toothpicks
Microwave-safe bowl for melting candy
Cake pop stand or styrofoam block for drying
Ingredient Swaps & Additions
I promised you versatile, and here’s proof!
Cake flavor: Red velvet is amazing for a spooky effect, but vanilla, chocolate, or funfetti all work too.
Frosting: Swap in buttercream or even Nutella if that’s your jam.
Candy coating: Try white almond bark or colored candy melts for a funkier look.
Eyes: Don’t have candy eyes? Use mini marshmallows with a chocolate chip in the center, or pipe your own with royal icing!
How to Make Eyeball Cake Pops
Step 1: Bake the Cake
Prepare your cake according to the package directions and let it cool completely. This is important—warm cake can melt the frosting and make the mixture too mushy.
Step 2: Crumble the Cake
Once cooled, crumble the cake into fine crumbs using your hands or a food processor. Place in a large bowl.
Step 3: Mix with Frosting
Add the cream cheese frosting and mix until you have a thick, dough-like consistency that holds its shape when rolled.
Step 4: Roll Into Balls
Scoop about 1 tablespoon of the mixture and roll into balls. Place them on a parchment-lined baking sheet. You should get about 20–24 pops depending on the size.
Step 5: Chill
Refrigerate for at least 1 hour or freeze for 20–30 minutes. This helps them firm up and makes dipping way easier.
Step 6: Insert the Sticks
Melt a small amount of the candy coating and dip the end of each stick into it before pushing it halfway into each cake ball. This helps the stick stay in place.
Step 7: Dip the Cake Pops
Melt the rest of the candy melts or white chocolate in a microwave-safe bowl in 30-second increments, stirring in between. Dip each cake pop straight down into the coating and gently tap off excess.
Step 8: Decorate
While still wet:
Press a candy eye or colored candy onto the center.
Use red gel or a toothpick dipped in red food coloring to draw spooky veins.
Once dry, use black gel or a food-safe marker to dot the pupil.
Let them set upright in a styrofoam block or cake pop stand.

What to Serve With Eyeball Cake Pops
These spooky treats are a showstopper all on their own, but you can serve them with:
Witches’ Brew punch
Mini mummy hot dogs
Spiderweb cupcakes
“Graveyard” dirt pudding cups
Perfect for Halloween dessert tables or October birthday parties!
Tips for Perfect Eyeball Cake Pops
Don’t overmix the frosting—it should be just moist enough to hold together.
Chill thoroughly before dipping!
Use a deep, narrow cup or bowl for dipping so you get full coverage.
If your coating cracks, your cake balls may be too cold. Let them sit out for a few minutes before dipping.
Use gloves if working with red gel to avoid stained fingers (trust me, learned that the hard way).
How to Store Eyeball Cake Pops
At room temp: Store in an airtight container for up to 3 days.
In the fridge: Lasts 5–7 days—just make sure they’re sealed to avoid condensation.
Freezer-friendly: Freeze uncoated cake balls for up to 2 months. Thaw before dipping and decorating.
FAQ About Eyeball Cake Pops
Can I make these without a cake pop mold?
Absolutely! You don’t need any special molds—just your hands and a little patience.
My cake pops keep falling off the stick. What can I do?
Make sure your balls are chilled and you’re dipping the stick in melted candy coating before inserting it.
Can I make these ahead of time?
Yes! You can make them 1–2 days in advance or freeze them undecorated for later.
How do I make the eyes more realistic?
Use colored fondant for irises, black gel for pupils, and a fine brush or toothpick to draw subtle veins for that ultra-creepy look.
A Sweet & Spooky Conclusion
These Eyeball Cake Pops are everything I love about holiday baking—fun, festive, and a little over-the-top! Whether you’re making them with kids, for a Halloween bash, or just because you’re feeling a little spooky this season, they’re sure to steal the spotlight (and probably a few double takes).
If you try these out, I’d LOVE to hear how they turned out! Tag me in your creations or pin a photo to your Halloween board on Pinterest. And don’t forget to subscribe to get more fun, themed recipes sent straight to your inbox.
More Peachy (& Spooky!) Recipes to Try Next
Halloween Candy Bark with Gummy Worms
Monster Eyeball Donuts
Pumpkin Cake Balls
Peach Hand Pies with Cinnamon Glaze (less spooky, more cozy!)
Nutritional Info (per cake pop – approx.)
Calories: 180
Fat: 9g
Carbs: 24g
Sugar: 18g
Protein: 1g
(Values are approximate and will vary based on ingredients used.)
Wishing you a sweet, spooky, and sensational time baking these Eyeball Cake Pops! 👁️🎃

